On-demand feature environments has the capability of creating isolated, temporary environments to develop, test, and deploy specific features or changes in a software application. These environments are created as needed, on-demand, and this can be a part of the deployment pipeline
This article exclusively focuses on React Static Applications hosted in Amazon S3
There are managed AWS services like Amplify to deploy your React application in a few steps then you will already have an on-demand feature environments. But you don’t need a server to host a React static web application. If you are using S3 buckets to host your application, setting up feature environment is much more complicated.
This article assumes you already have a functional React project or any other frontend framework with a static build feature. It does not provide instructions on building or creating such a project.
Benefits of feature environments
- Isolation: Each feature or change in the application is developed and tested in its own isolated environment. This isolation helps ensure that changes made for one feature do not interfere with other features or the overall stability of the application.
- On-Demand Creation: Feature environments are created dynamically as needed. When a developer or team is working on a new feature or change, they can create an isolated environment specifically for that feature. This allows them to develop, test, and validate the changes independently without affecting the main production environment.
- Collaboration: Feature environments facilitate collaboration among team members. Developers can share the environment with testers, product owners, or other stakeholders, allowing them to provide feedback and review the feature in an environment that closely resembles the production setup.
- Rapid Iteration: Since feature environments are isolated and independent, developers can iterate quickly and make necessary changes without affecting other features or the production environment. This allows for faster development cycles and more efficient testing and validation processes.
So what are the pre requisite?
- Basic knowledge of AWS
- A React Static application
- Basic knowledge React
- Basic knowledge Github/Actions
Let’s get started.
Tech Stack
We will use Github Actions and AWS CloudFormation

Goal
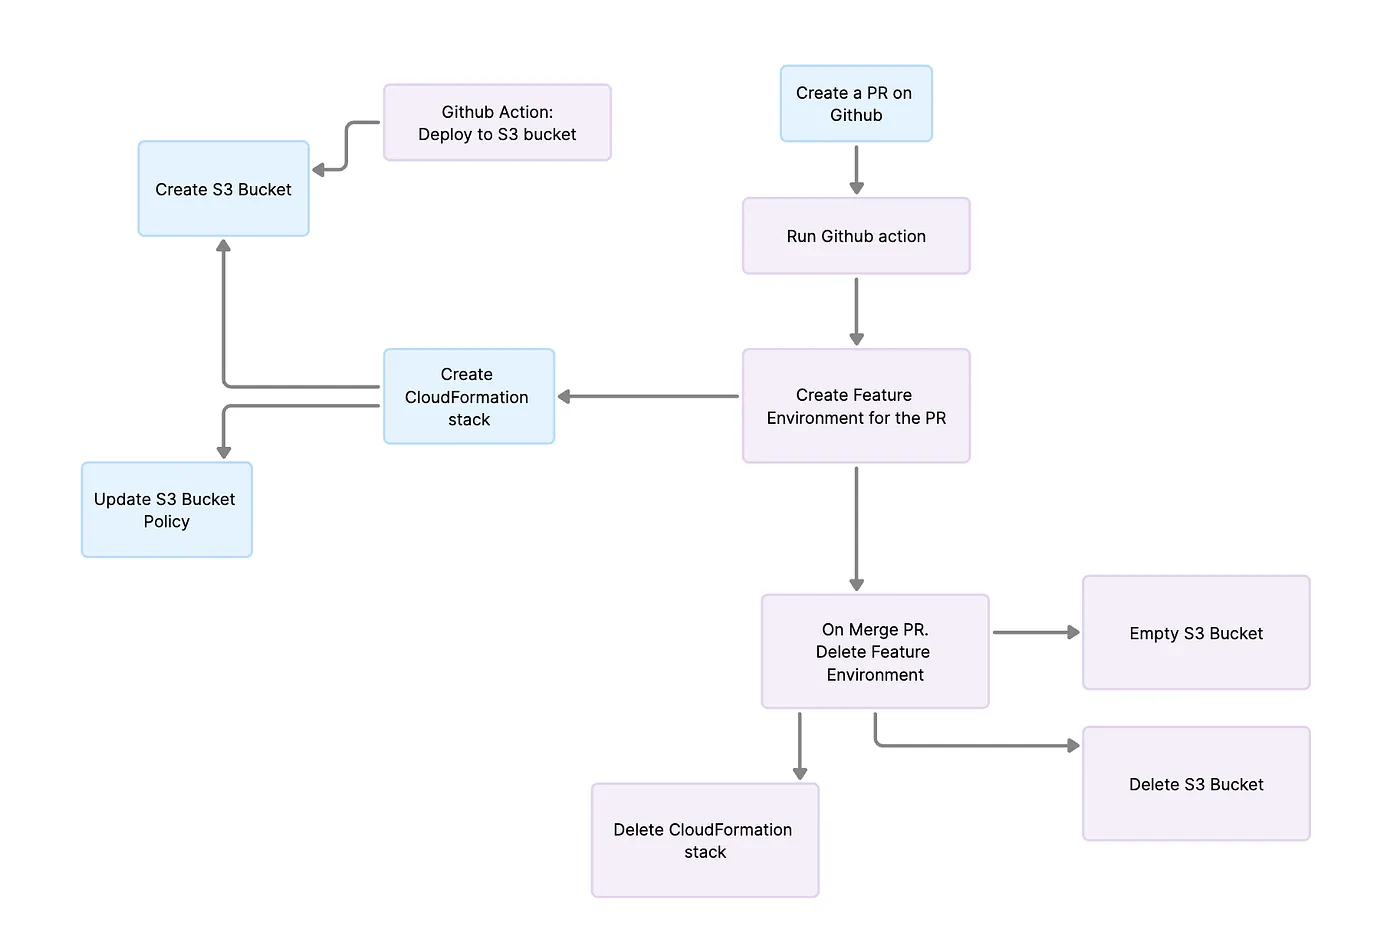
Once the Developer pushed their code to Github they will open a PR against the develop branch. At this point a Github action will run and trigger CloudFormation stack to create a temporary s3 bucket then it will deploy the React application to a temporary s3 bucket. Once the PR is merged all of these created services will be deleted.
Write CloudFormation Template
First step to building our feature environments is creating the S3 buckets. We will use CloudFormation for this.
A Word About CloudFormation: AWS CloudFormation is a service provided by Amazon Web Services (AWS) that allows you to create and manage AWS resources using templates. It is an infrastructure-as-code (IaC) service that enables you to describe your infrastructure and application resources in a declarative template format.
Now let's get started with creating the CloudFormation Template:
{
    "AWSTemplateFormatVersion": "01",
    "Parameters": {
        "BucketName": {
            "Type": "String",
            "Description" : "Name of the bucket"
        }
    },
    "Resources": {
        "FeatureEnv": {
            "Type": "AWS::S3::Bucket",
            "Properties": {
                "BucketName": { "Ref" : "BucketName" },
                "OwnershipControls": {
                    "Rules" :[
                        {
                            "ObjectOwnership": "BucketOwnerPreferred"
                        }
                    ]
                },
                "WebsiteConfiguration": {
                    "IndexDocument": "index.html",
                    "ErrorDocument": "error.html"
                },
                "BucketEncryption": {
                    "ServerSideEncryptionConfiguration" : [ {
                        "BucketKeyEnabled" : false
                        }]
                  }
                  ,
                "LoggingConfiguration":  {
                    "DestinationBucketName": {
                        "Ref": "BucketName"
                    },
                    "LogFilePrefix": "feature-logs"
                },
                "VersioningConfiguration":{
                    "Status": "Enabled"
                },
                "PublicAccessBlockConfiguration" : {
                    "BlockPublicAcls" : false,
                    "BlockPublicPolicy" : false,
                    "RestrictPublicBuckets" : false
                }
            },
        },
        "BucketPolicy": {
            "Type": "AWS::S3::BucketPolicy",
            "Properties": {
                "PolicyDocument": {
                    "Id": "FeatureEnvPolicy",
                    "Version": "2012-10-17",
                    "Statement": [
                        {
                            "Sid": "PublicReadGetObject",
                            "Effect": "Allow",
                            "Principal": "*",
                            "Action": "s3:GetObject",
                            "Resource": {
                                "Fn::Join": [
                                    "",
                                    [
                                        "arn:aws:s3:::",
                                        {
                                            "Ref": "FeatureEnv"
                                        },
                                        "/*"
                                    ]
                                ]
                            }
                        }
                    ]
                },
                "Bucket": {
                    "Ref": "FeatureEnv"
                }
            }
        }
    },
    "Outputs": {
        "WebsiteURL": {
            "Value": {
                "Fn::GetAtt": [
                    "FeatureEnv",
                    "WebsiteURL"
                ]
            },
            "Description": "URL for website hosted on S3"
        },
        "S3BucketSecureURL": {
            "Value": {
                "Fn::Join": [
                    "",
                    [
                        "https://",
                        {
                            "Fn::GetAtt": [
                                "FeatureEnv",
                                "DomainName"
                            ]
                        }
                    ]
                ]
            },
            "Description": "Name of S3 bucket to hold website content"
        }
    }
}
This CloudFormation template creates an AWS S3 bucket for the feature environment. It sets up various configurations like ownership controls, website settings, encryption, logging, versioning, and public access restrictions. It also includes a bucket policy that allows public read access to objects within the bucket. The template provides outputs for the website URL and the secure URL of the S3 bucket. The complete URL template will look like this:
feature-${{github-pr-number}}.s3-website.region.amazonaws.comYou need to replace the region with the region where you want to deploy.
Setting up Github actions
A Word About Github Actions: GitHub Actions is a powerful workflow automation platform offered by GitHub. It enables developers to automate tasks and processes within their software development lifecycle. With its integration with GitHub and a marketplace of reusable actions, it provides flexibility, scalability, and efficiency in building CI/CD pipelines and automating various development workflows.
We will be needed two Github actions. One is to create the feature environment when a developer create a pull request. The second one is to delete the feature environment when a developer merge a pull request.
Deploy CloudFormation stack:
name: Deploying to Feature Environment
on:
  pull_request:
        types: [opened]

jobs:
  infra-deployment:
    runs-on: ubuntu-latest
    steps:
      - name: Checkout
        uses: actions/checkout@v2

      - name: Configure AWS credentials
        id: creds
        uses: aws-actions/configure-aws-credentials@v1
        with:
          aws-access-key-id: ${{ secrets.ACCESS_KEY_ID }}
          aws-secret-access-key: ${{ secrets.SECRET_ACCESS }}
          aws-region: "the-region"

      - name: Deploy S3 Buckets CloudFormation Stacks
        id: s3-buckets
        uses: aws-actions/aws-cloudformation-github-deploy@v1.0.3
        with:
          name: feature-${{github.event.number}}
          template: cloudformation/feature-environment.template.json
          parameter-overrides: >-
            BucketName=feature-${{github.event.number}}
      - name: Add comment to the PR
        uses: thollander/actions-comment-pull-request@v2
        with:
          message: |
            Hello! Your feature envrionment available at: http://feature-${{github.event.number}}.s3-website.region.amazonaws.com :wave:
  call-deployment-workflow:
        name: "Deploy code to the feature environment"
        uses: ./.github/workflows/deployment-workflow-call.yml
        secrets: inherit
        with:
          environment: feature
          bucket_name: feature-${{github.event.number}}
Deploy to S3 using deployment workflow call: Above action will deploy our CloudFormation template and it will create fresh s3 bucket. Now we can create another action file for deploying to the s3 bucket.
on:
  workflow_call:
    inputs:
      environment:
        description: 'Environment to be used when running the workflow'
        required: true
        type: string
      bucket_name:
        description: 'Bucketname to be used when running the workflow.'
        required: false
        type: string
      release_tag:
        description: 'Environment to be used when running the workflow'
        required: false
        type: string

jobs:
  feature-deploy:
    if:  inputs.environment == 'feature'
    runs-on: ubuntu-latest
    environment: ${{ inputs.environment }}
    strategy:
      matrix:
        node-version: [16.x]
    env:
      REACT_APP_ENV: ${{ inputs.environment }}
    steps:
    - uses: actions/checkout@v3
    - name: Deploying to ${{ inputs.environment }}
      uses: actions/setup-node@v3
      with:
        node-version: ${{ matrix.node-version }}
        cache: 'npm'
    - run: npm install --silent
    - run: npm run build --if-present
    - name: Push to ${{ inputs.environment }} S3 bucket
      uses: jakejarvis/s3-sync-action@master
      with:
       args: --acl public-read --follow-symlinks --delete
      env:
        AWS_S3_BUCKET: ${{ inputs.bucket_name }}
        AWS_ACCESS_KEY_ID: ${{ AWS_ACCESS_KEY_ID }}
        AWS_SECRET_ACCESS_KEY: ${{ AWS_SECRET_ACCESS_KEY }}
        AWS_REGION: 'region'
        SOURCE_DIR: 'dist'
Delete the stack and s3 bucket:
name: Cleaning up the feature environment
on:
  pull_request:
        types: [closed]

jobs:
  infra-deployment:
    runs-on: ubuntu-latest
    steps:
      - name: Checkout
        uses: actions/checkout@v2
      - name: Empty and delete S3 bucket
        run: |
          aws s3 rm s3://feature-${{github.event.number}} --recursive
        env:
          AWS_ACCESS_KEY_ID: ${{ AWS_ACCESS_KEY_ID }}
          AWS_SECRET_ACCESS_KEY: ${{ AWS_SECRET_ACCESS_KEY }}
          AWS_REGION: 'region'
      - name: Delete CloudFormation stack
        run: |
          aws cloudformation delete-stack --stack-name feature-${{github.event.number}}
        env:
          AWS_ACCESS_KEY_ID: ${{ AWS_ACCESS_KEY_ID }}
          AWS_SECRET_ACCESS_KEY: ${{ AWS_SECRET_ACCESS_KEY }}
          AWS_REGION: 'region'
Key takeaways
- On-demand feature environments offer significant advantages for frontend projects, enabling isolated testing, faster iterations, and reduced development time.
- AWS and Github Actions provide a powerful combination to automate the provisioning and deployment of on-demand feature environments.
- Utilizing AWS CloudFormation simplifies the setup process by defining the desired configurations and resources for the feature environments.
- CloudFormation enables the creation of an AWS S3 bucket with customized settings for hosting frontend websites or feature environments.
- The bucket configuration includes ownership controls, website settings, encryption, logging, versioning, and public access restrictions.
- A bucket policy can be applied to allow public read access to objects within the bucket, enhancing accessibility for testing and collaboration purposes.
- The integration of Github Actions allows for seamless deployment of code changes to the feature environments, ensuring a smooth development workflow.
- On-demand feature environments enhance frontend project efficiency by promoting faster feedback loops, efficient collaboration, and accelerated development cycles.
By leveraging AWS and Github Actions, developers can leverage on-demand feature environments to streamline their frontend projects, resulting in improved efficiency and productivity throughout the development process.
Thank you for joining me on this journey to explore how to build on-demand feature environments with AWS and GitHub Actions from scratch. By leveraging the power of AWS services and the flexibility of GitHub Actions, you can create isolated environments for developing, testing, and deploying features with ease. I hope this article has provided you with valuable insights and inspiration for incorporating